recipes

Homemade Donuts

I gave up eating donuts many years ago.

Besides not needing all those calories, I hated the unhealthy canola oil that was used to fry them in, plus all that sugar and yucky dough…. it was not a hard thing to give up.

Fast forward a few years. We were visiting some wonderful friends who liked making healthy donuts.

I can just see you frowning and shaking your head. But it’s true! Let me explain.dec 2017 014

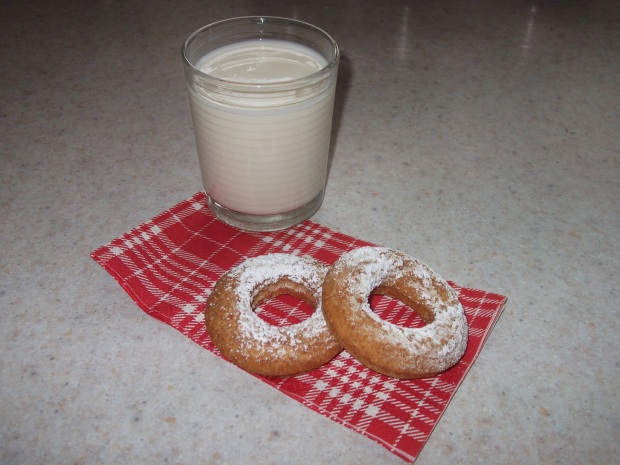
First of all they prepared flour from freshly ground spelt kernels and soaked the flour in a sour cream mixture for 8 hours or overnight. This neutralizes the phytic acid in the flour, making the finished product more digestible.

Later that day, they heated up some tallow, rendered from their own beef fat, and used that to fry their donuts in.

Wholesome, yummy, lip-smacking, tasty donuts.

Did I mention that even the kids went nuts for these?

Our friend could hardly keep up at first, only when the kids (and I must admit, the adults too) were full, did the donuts finally start filling the cooling rack. 🙂 Luckily she had a huge batch going.

Later, with gifted tallow from our friends, I tried making donuts too at home, the first attempt was a bit of a failure, but the following batches were quite successful.

Making donuts is not something I do often. Maybe once a year. But it’s always memorable and I make a nice, big batch. They always disappear fast.

During my last donut-making session I decided to take some pictures and share.

These are the only donuts I will eat. 🙂

Healthy Donuts:dec 2017 002

  • 4 cups flour (freshly ground and lightly sifted, if possible, to get the optimum nutrition)
  • 1.5 cups sour cream

Mix well and let sit overnight, or at least for 8 hours. The dough will be stiff, not very pliable, see below.dec 2017 007

Next morning add:

  • 2 eggs
  • 1 t baking soda
  • 1 t baking powder
  • 1 t sea salt
  • 1 1/2 c sugar
  • 1 1/2 – 1 3/4 c flour (unbleached white) to thicken

dec 2017 008

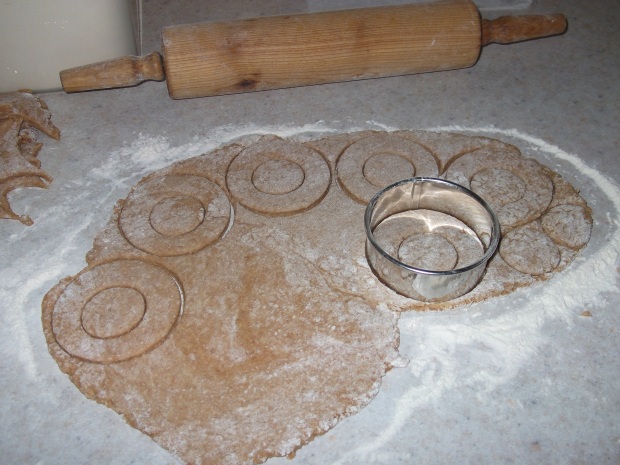
Sprinkle your (clean) counter top with some flour and roll out the dough, half an inch thick or slightly thinner, cut the donuts and bits with a donut or biscuit cutter and pop the donuts in the oil/fat that you’ve heated up in a Dutch oven (or deep fryer), they will sink to the bottom.

dec 2017 010

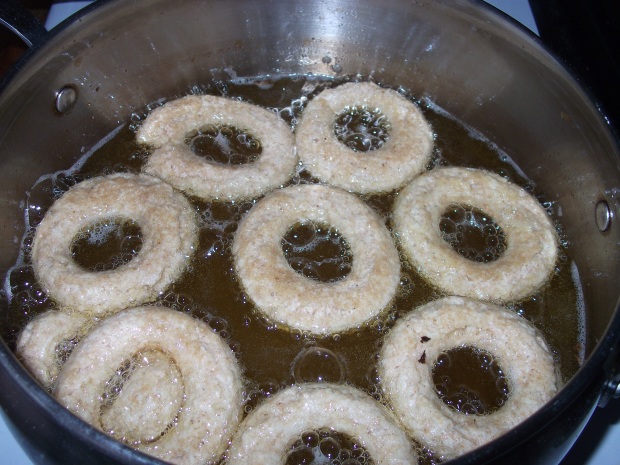
Once the donuts float to the top you can then turn them, 1 – 2 minutes per side or until golden-brown.dec 2017 011

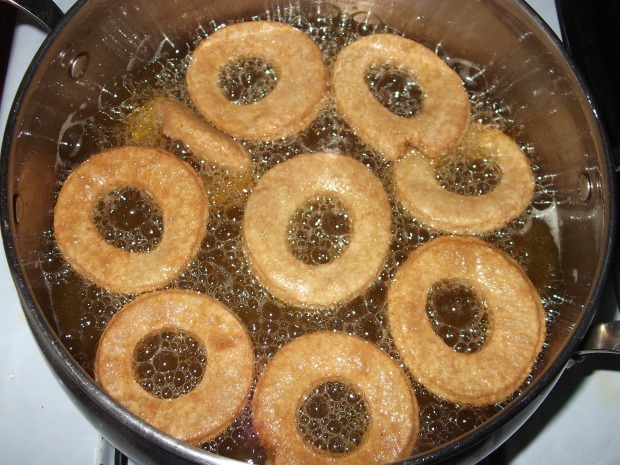
Lift the fried donuts and set them on a cookie sheet lined with several layers of paper towel, this will absorb some of the fat. Sprinkle donuts with icing sugar if you wish…..I wished.dec 2017 016


Let cool, eat until full 🙂 and put remaining donuts in an air-tight container, they will keep for several days if you are able to hang on to them for that long.

This batch makes at least 30-40 small to medium-sized donuts plus their Canadian called Timbits, donut holes in the states, or trous de beigne en francais.dec 2017 012

Healing Salve

Every summer, when the herbs are fresh and full of healing properties I make infused oils,

Sept 2016 044lavender, comfrey, plantain, calendula, Saint John’s Wort (SJW), arnica, etc.

I remember doing a few posts on how to make the oils here, here and here.

Once the oils are made, I usually stick them in the pantry and forget about them until I need to make a new batch of healing salve.herbs 007

Today was that day.

There must be as many recipes for healing salve as there are herbalists. It seems each herbalist has his/her own special blend. Over the years I’ve developed my own combination of healing blends as well.

The oils in this healing salve are especially good for little wounds, such as blisters, rashes, bruises, burns, scrapes, bug bites, etc. It’s great to have this salve on hand if you have young ones, but can be used and is good for people of any age.

If you need salves that are geared more towards pain management you’ll need to use a combination of different herbs such as, but not limited to, cayenne, black pepper, kava-kava, ginseng, saint john’s wort, willow bark, turmeric and valerian root plus some essential oils, especially wintergreen.

But today we’re making healing salve.herbs 001

The oils that I used for the healing salve were arnica, calendula, comfrey, plantain and SJW and I measured out roughly two tablespoons of each.herbs 002

Arnica is good for bruises, chapped lips, muscle pain, insects bites and more, (do not use on large open wounds).

Calendula is good for skin dryness, chapping, soothes skin irritations, reduces pain, it is an anti-inflammatory as well.

Plantain helps reduce swelling and rashes, helps heal cuts, may be used for insect and snake bites.

Comfrey is good for healing sprains and broken bones, speedy wound healing, prevents and heals scars, prevents skin dryness, it also acts as an anti-inflammatory.

SJW is excellent for treating burns (including sunburns) and nerve pain, it also protects and soothes the skin.

These are just the external benefits, many of these herbs can also be taken internally to treat different issues.

Pour the oils into a small saucepan and to these oils add 2 tablespoons of beeswax. The beeswax firms up the oil so it can be rubbed into the skin, but it also contains its own healing properties, it forms a protective barrier and holds in moisture thereby preventing dryness. The broken up pieces of beeswax shown above came from our own hives.

It doesn’t take much heat to melt the beeswax and you can remove the small saucepan from the heat before the last bit of wax has melted. The beeswax will continue to dissolve.

herbs 004

To the oil and melted beeswax add 20 drops of lavender oil, which helps with cell regeneration, and 20 drops each of rosemary and myrrh tincture. Normally I prefer to use the essential oil of these herbs, but I didn’t have any on hand.

Lavender helps with wounds, cuts, burns and sunburns, may help with acne and wrinkles.

Rosemary contains antimicrobial and antiseptic properties, adding it to a skin healing salve makes sense to me.

Myrrh is full of antioxidant properties making it great for skin rejuvenation and healing.

As I’m writing this post I realize I forgot to add a little tea tree oil. The smell of this oil is very strong, sometimes a little harsh. I do leave it out at times but admit that tea tree oil has amazing healing properties. Hopefully I’ll remember to add it to my next batch. 🙂

Have your little salve jars ready.herbs 003

Carefully pour the oil/beeswax solution in your jars, this needs a steady hand and preferably a little pan with a good spout for pouring.

The jars are filled.herbs 005

In a very short time the salve will set.herbs 006

If you have a color printer, it’s nice to label the jars with a pretty label or you can choose to just write the details and contents of each jar on a label. When you are preparing a large quantity of jars you’d appreciate the help of a printer. Listing the contents of each jar is especially important when sharing the healing salve with other, they’ll want to know what’s in the salve.

To use the salve, rub a generous amount into the skin as often as needed.

If you live in my neck of the woods, feel free to pick up a sample of healing salve.

Pork and Beans

This is a funny title to use for someone who hasn’t eaten pork in years!

Nov 2017 014

The reasons why I didn’t eat pork for many years are too lengthy to go into for the purpose of this blog, but suffice it to say that several years ago I learned that there is one type of pork that is still wholesome, and that is the meat of the Tamworth pig, whose genetics are still pure and trace back to the wild boars of Europe’s forests.

The  Tamworth bacon (home cured of course) was so good I wanted to use it for other things besides the delicious and popular bacon and eggs breakfast.

At work the other day, I found a can of American pork and beans, the Bush brand, claimed by many to be the best. I cracked it open for the seniors as a nice addition to their supper and the delicious smell overwhelmed me.

“Wow, I gotta reproduce this at home using wholesome, organic ingredients,” I thought immediately. Since then that thought has hardly escaped my thoughts, I’ve looked online for home canned pork and beans recipes, looked through my recipe books at home and compared all these to the label from the Bush beans can.

Finally, I may have found a good base recipe which I ended up tweaking a bit. The end results are… well… overwhelming.

Anyone can do this at home provided you’ve got a pressure canner. The ingredients are super simple and will most likely, with the exception of an item or two, be waiting on your pantry shelves.

I had faith in this recipe so went ahead by making a big batch, 12 jars total. But if you only want to do a couple of jars you can easily adjust the amounts and try it out. And if you don’t have a pressure canner you can just make this dish for your supper. 🙂

To each clean pint jar add:

  • 1/2 c Navy beans (you can also use Great Northern beans)
  • 2-3 T chopped onion
  • 1/2 clove garlic, minced
  • 1 slice of bacon, diced, (fried if you prefer)
  • 1/2 t sea salt
  • 1/2 t apple cider vinegar (optional)
  • 1/8 t liquid smoke (optional)Nov 2017 004

In a large pot combine the following ingredients for the sauce:

  • 2 liters (or quarts) of tomato sauce
  • 1/2 c brown sugar
  • 1/4 c maple syrup
  • 2 t dry mustard
  • 7 c water

These amounts for the sauce are enough to fill 12 pints, so if you’re only doing one or two remember to adjust the amounts. You should count on using a generous 1.5 cups of sauce per pint jar. Nov 2017 006

Bring the sauce to boil and pour over the beans in each jar, the professionals say to leave 1 inch headspace, seal each jar with a lid and ring and put the jars in your pressure canner. I’ve since decided that I’ll fill each jar to within 1/2 an inch of the top when I make these beans again.

The other thing I’ve learned is that it’s better to have a very watery tomato sauce because the beans are going to be soaking up some liquid as they’re being cooked in the pressure canner. The sauce was nearly perfect as I poured it over the uncooked beans initially, see picture above.

Pressure can for 75 minutes using the instruction guidelines of your pressure canner. If you lack those, check out this post Canning Green Beans for further instructions but make sure you use 75 minutes of cooking time at the appropriate weight for your altitude.

Nov 2017 008

had a double decker here, six jars on the bottom, six on top

After the beans were cooked I noticed a lot of liquid loss due to thirsty beans hence the tomato sauce became way thicker. This is why I’ll thin that sauce quite a bit more next time.Nov 2017 013

These beans are going to be great on a cold night when a quick, yet tasty supper’s needed.

Let me know what you think of them if you prepare them too.

PS Wish I would have cleaned my jars before photographing them. 🙂

Colorful Freezer Slaw

There’s so much cabbage left in the garden. Time to get creative.

sept 2017 023

garden early September

In a week or so I’ll be making a huge batch of sauerkraut, but for today I dealt with the cabbage in another way.

Did you know you can freeze coleslaw?

Yah, a few years ago I didn’t know either, but it does really work!

This morning I harvested a medium green cabbage, a tiny red cabbage, 3 large carrots, a large onion and a green pepper.

Once everything was washed I let the food processor chop everything up and dumped the whole load in a big bowl.oct 2017 035

Pretty hey?

I sprinkled a tablespoon of sea salt overtop and let it sit for about 1 hour.

In the meantime, I prepared the dressing.

  • 2 T lime basil, dried
  • 1 T finely lime zest
  • 1/4 c lime juice
  • 3-4 T maple syrup
  • 2 T apple cider vinegar
  • 1 garlic clove, minced
  • sea salt and pepper to tasteoct 2017 037

Combine the dressing ingredients and mix thoroughly into the slaw.

Divide the coleslaw into freezer-safe containers or bags and place in the freezer.

oct 2017 040

I use bags because it saves on freezer space

This slaw is so gorgeous and tasty when you pull it out of the freezer come winter, all these rich harvest colors and summer fresh flavors to brighten the day when the weather outside is so dull and blah.

To use, just let it thaw, then add a bit of mayo if needed.


Tomato Salsa

We’re running out of time!

This is early September. Tomato season is almost over and I have yet to can a single salsa or spaghetti sauce.sept 2017 010

It’s true.

Usually my favorite thing to can is salsa but this year the tomatoes are just not cooperating, it’s been too cold.

I was finally able to harvest enough tomatoes for a small batch of salsa and thought I’d share the recipe with you. Whenever I bring this salsa to any function or party there’s always someone who wants the recipe.

The original recipe came from Jean Paree’s What’s Cooking canning cookbook, but over the years I’ve definitely tweaked it. In fact, it gets tweaked a little every year, depending on which peppers are growing in the garden.sept-2016-007

For one batch of Salsa, you’ll need the following:

  • 4-5 lbs tomatoes
  • 3 onions,
  • 3-4 garlic cloves
  • 1 jalapeno pepper
  • 2 big assorted sweet bell peppers
  • 1/4 vinegar (any)
  • 1 t crushed chillies
  • 1 T sea salt
  • 1 t sugar
  • 1 1/2 paprika or chipotle depending on how hot you like your salsa
  • 4-6 pint jars with lids and rings

Over the years I’ve learned to create a lot of shortcuts when it comes to mega food preservation. The experts tell you to blanch the tomatoes for a minute and then to slip their skins off. That’s how I started making salsa and sauce too. But I quickly saw that this is just a bunch of nonsense, it’s just too much work! I promise, your salsa will turn out fine without all the fuss, just look at the top picture.

So, I wash my tomatoes, take the core and any bad spots out, squeeze some of the seeds and watery juice out and plop them in my food processor.sept 2017 002

Once the food processor bowl is full, the tomatoes get processed into a chunky slop and thrown into a big pot.sept 2017 003

The onions, peppers and garlic also get chopped in the food processor and added to the big pot of chunky tomatoes.sept 2017 004

Then all the seasonings are added,

sept 2017 005

paprika, chipotle, chilies, sea salt, lime balm and garlic


as well as the vinegar and sugar. The big pot is brought to a boil, then it simmers for 2-3 hours depending on how thick or thin you like your salsa. Mine usually simmers for 3 hours.

Stir the salsa often and once you’re happy with the consistency fill your clean jars, seal them and put them in a hot water bath for 10-15 minutes.sept 2017 007

September 26th

Well, the post above was written 2 weeks ago. Then it got hot again, real hot! Now, with temperatures still soaring into the thirties and above, (in fact it is hotter now than it has been all summer), the tomatoes are ripening like crazy.

Every other day there’s a basket full again. The pictures above were taken during a huge canning session, so I quadrupled all the amounts in my recipe.

It’s wonderful for ripening tomatoes, but I tell you…this kind of heat at this time of year just feels weird. We’ve been setting new records, it’s just sweltering out there.

sept 2017 011

we tested two different thermometers….just to be sure!

Looks like we’ll have a great tomato harvest after all….just several weeks later than normal. 🙂

Spaghetti sauce is next in line.


Kale Chips

Anyone interested in wholesome, healthy food will have heard about and/or tried kale chips.

sept 2017 017

It was my abundant crop of kale in the garden that made me want to try some “hippie food” as Farmer Hick calls the chips.sept 2017 006

“They’re good and easy to make,” I was told.

Well, they were…easy to make that is.

Drizzle the chopped kale with some olive oil and sea salt and bake at 350 degrees for 10-15 minutes.

Whether they are good is a personal opinion, I didn’t think much of them.

Until….

I have the great fortune, (and pleasure) to have a wonderful group of friends who are all into good food and healthy eating. At one of our recent visits, on the beach (yes, homesteaders do take time off), a bag of homemade kale chips was passed around and one of those hallelujah moments was born.

You gotta understand, these were not your ordinary kale chips, they were the all dressed variety alright.

My friend said it contained ingredients like olive oil, cashews, nutritional yeast, garlic, lemon, sea salt, and maybe some more yummy things I can’t remember.

Once home, I looked for a similar recipe on-line… there were lots to choose from. 🙂

This is what I do now and you better believe me, these chips are better than good!

sept 2017 013

coconut oil, sea salt, lime juice, garlic powder, nutritional yeast, almond meal, chipotle powder

In a large bowl combine:

  • 1 bunch kale (8-12 leaves) stems removed, kale torn into bite-sized pieces
  • 2 T coconut oil (you can use olive, avocado, whatever you like)

Rub the oil into the kale until the kale is nicely coated, it’s easiest to just use your (clean!) hands.sept 2017 014

In a small bowl combine the following ingredients,

  • 2 t almond meal
  • 1/2 t garlic powder
  • pinch cayenne pepper (smoked chipotle powder is really good too)
  • 1 t sea salt
  • 1 T lemon juice or balsamic vinegar
  • 1/4 c nutritional yeast (or Parmesan, the yeast tastes wonderful though)

Mix well and add to the kale, tossing the kale until the mixture is evenly distributed.

Spread the kale on a cookie sheet and bake at 375 degrees for 10-15 minutes or until the kale is crispy.sept 2017 015

Enjoy your all dressed kale chips.

Even your kids will probably like them.

Pear Butter

Yesterday’s post was fast and furious. I mentioned doing a whole lot of stuff yet never gave any details.sept 2017 009

Today I got a request for the pear butter recipe, so I’ll go into more details on that. In the picture above, the pear butter is in the half pint jars.

Basically pear butter can be used like you would use jam… and a whole bunch of other things, more on that later.

Most people will be familiar with Apple Butter, with it’s heavy flavoring of cinnamon and clove or nutmeg. Pear Butter is made the same way but the flavor is very different. Pears have a more delicate taste and are quite aromatic, so I use different spices.

Here’s how I do it.sept 2017 004

Wash and quarter 4-5 pounds of pears, remove the stems but you can leave the blossom ends. Put all the pear quarters in a big stock pot, cover with water and bring to a boil. Boil for 20-30 minutes or until the pears are mushy.

sept 2017 006

the pears will become quite mushy and cook down a lot!

Drain off the water, but save this because it makes nice pear juice! Now get your food mill out and dump all the pears into the mill and process. What comes out the food mill will be delicious pear pulp without pits, peels or blossom ends.

Put the pear pulp in a thick bottomed pot and add the following:

  • 1 cup sugar (you can add more towards the end of cooking time if needed)
  • 2-4 star anise
  • 1/2 t ground ginger
  • 1/2 t cardamom
  • 1/4 t nutmeg
  • 1-2 T lemon or lime juice
  • 1 t lemon or lime zestsept 2017 002

Cook this on low heat, stirring regularly until you’re happy with the consistency, it should be thick enough to stay on a spoon and could take an hour or more.

At this point you could can it, or put it in freezer safe containers and freeze it.

I’m always struggling with freezer space, so I can it. A 10 minute hot water bath should be sufficient.sept 2017 003

The most obvious way to use this lovely butter is to spread it on your toast or muffin, or put it on waffles, pancakes etc. Give it a try in your oatmeal, it’s good! You can add it to cookie dough (especially oatmeal cookies), try it over vanilla ice cream, you can even glaze your chicken or pork with it. Use your imagination. 🙂

At this rate it’s not going to last long…better look for another pear tree!

Coleslaw

This will be a quick post.

Just had to show you the vibrant harvest colors from the garden today, a nice early cabbage, red onion and some carrots.aug 2017 001

They made a nice coleslaw.

  • 1/4 – 1/3 of a small cabbage
  • one small red onion
  • one large or 2-3 smaller carrots

Dump it all in the food processor and process until the desired consistency is reached. At home I leave it fairly coarse but at work I process this until it’s very fine because it’s easier for the seniors to manage. 🙂 Either way is fine.aug 2017 002

For the dressing:

  • 1/2 c mayonnaise (homemade or not)
  • 1 T lemon or lime juice
  • 1 T maple syrup
  • sea salt and pepper to taste

you can add things like celery seed and ground mustard, they taste pretty good but I try to keep it simple.aug 2017 003

Cabbage is very good for us. It’s rich in vitamins B, C and K plus many minerals, it’s good for our brain and helps keep our eyes, skin and hair healthy. Throw in the added benefits of carrot and onion and you have a power-food salad/slaw at hand.

A nice quick, raw food dish that tastes and looks good too!

Italian Cauliflower

The mystery of growing perfectly formed, organic, backyard cauliflower is mystery no more….at least on this homestead.

Every year I set out a few cauliflower seedlings, give them compost, eggshells, water, etc. Usually the plants grow quite well and form a teeny, cream-colored head that goes to the sprouting stage right away. Even if I wait one extra day to give the heads a chance to grow bigger, it’s often too late. Ugly, unappetizing cauliflower….until this year.

I showed a picture before of our Italian broccoli growing in the garden. At the time it was small, but looked good. aug 2017 024

This is what I harvested yesterday, a week later than that first picture.aug 2017 012

Of course the watery, cool summer could be responsible, but from now on this is the cauliflower I’ll plant every spring. I bought the seed from Baker Creek Heirloom Seeds, it’s called Purple of Sicily Cauliflower. The little, individual stems are slim and long, reminding me of broccoli growth pattern, but the taste is all cauliflower.

Here’s how we enjoy eating our cauliflower on the homestead.

To cook the cauliflower, just remove the center core and pop the cauliflower on your steamer basket, or cut the cauliflower into bite-sized pieces.aug 2017 006

Steam for 7 minutes, longer if you’re leaving the cauliflower whole.

The Baker Creek seed catalog mentioned that this particular cauliflower turns green when cooked….aug 2017 007

that was not the case at all. Sure it changed color, but it did not turn green.

While the cauliflower is steaming prepare your cheese sauce:

  • 1 cup milk
  • 2 T butter
  • 2 T flour
  • 1/2 c (or more) grated cheese
  • sea salt and pepper to taste

Mix the butter and flour in a small pan over medium heat and slowly add the milk. Stir constantly until it thickens. Add the cheese, sea salt and pepper and pour over the cauliflower.aug 2017 008

Bon appetit!

Blueberry Jam

Well…we went blueberry picking one more time. This time two of my teenagers came with me, needless to say we ended up with a boat full of berries. I guess they want more pie.aug 2017 011

When you have access to as many fresh blueberries as I have you’ll want to make a batch or two of blueberry jam.

For one batch you’ll need:

  • 6 c blueberries
  • 1 package fruit pectin
  • 4 c sugar

Put the blueberries in a big pot and crush them. Add the pectin, stir well and bring to a boil stirring occasionally. Add the sugar and stir it in, bring this back to a boil stirring gently. Boil hard for 1 minute and remove from heat, keep stirring for a couple more minutes.

aug 2017 002

When I made this batch today it made 5 1/2 cups, I usually try to have an assortment of jars, some to give away, some to store in the pantry for eating later and sometimes there’s even a little left over that the family can eat right away. 🙂aug 2017 007

Bottle the jam. Boil the jars in a hot water bath for 10 minutes, this is not totally necessary but my jams always keep better if I remember this step.

This jam is great on toast, on pancakes and waffles too, and really good in a bowl of homemade yogurt or vanilla ice cream.